Welcome to Doom9's Forum, THE in-place to be for everyone interested in DVD conversion. Before you start posting please read the forum rules. By posting to this forum you agree to abide by the rules. |
 17th June 2018, 15:12
|
#1 | Link |
|
Registered User
Join Date: Mar 2015
Posts: 775
|
underwater correction
Share practice and ideas, continuation of https://forum.doom9.org/showthread.php?t=175479
Some testing samples Last edited by shekh; 17th June 2018 at 15:18. |

|

|
|
17th June 2018, 15:14
|
#2 | Link | |
|
Registered User
Join Date: Mar 2015
Posts: 775
|
Quote:
__________________
VirtualDub2 |
|
|
|
|
|
18th June 2018, 03:08
|
#3 | Link | ||
|
Registered User
Join Date: Jan 2004
Location: Here, there and everywhere
Posts: 1,197
|
Quote:
Quote:
As for GOPR1596, here's a slightly cooler version - takes a bit of that yellow off:  All done with with fine tweaks to the channel mix.
__________________
Nostalgia's not what it used to be Last edited by WorBry; 18th June 2018 at 14:04. |
||
|
|
|
|
19th June 2018, 05:19
|
#4 | Link |
|
Registered User
Join Date: Jan 2004
Location: Here, there and everywhere
Posts: 1,197
|
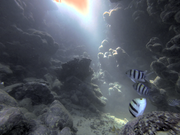
I am looking at the remaining three clips btw but I have to say they are quite challenging, especially using only the Channel Mixer to make the color corrections.
In the 'Cave' clip (cave-GOPR0238) the B&W striped Sergeant Major fish make an appearance again, but if I use them for neutral reference I'm fighting marked yellow discoloration of the 'skylight' opening and color variegation in the aura around it. Best strategy looks to be: 1. Apply a 'soft clip' to pull-down that super-white data with a smooth roll-off gradient - easy to do in Resolve, maybe could be done in VDub2 with (gradation) curves, I'll have to see. Incidentally, your clips are all recorded with full range luma (0-255) and all of the grading in Resolve is being done at full 'data levels', so there's no forced hard clipping (limiting) going on. Obviously in VDub2 the full range flagging on decode ensures that 'PC.709' conversion coefficients are applied by default. 2. Use the 'skylight' opening as neutral (daylight balanced) reference for the channel mix in the first instance. 3. Adjust the mix to achieve best compromise with the 'white' stripes on the Sergeant Major fish. I'm making headway but hitting that fine balance is finicky to say the least. I'll post once I've arrived at something presentable. I'm determined not to resort to qualifiers and the like, as I want to replicate the process in VDub2. BTW, did you use a dive light in that clip? Looks like the Sergeant Major fish closest to the camera are receiving some artificial illumination. If so, might explain why I'm finding it so hard to hit a good compromise. As for the other two clips. Difficulty in both is finding an identifiable neutral reference to go by. GOPR0201 at least has some skylight so I could try to apply the above strategy. There's also that shoal of really tiny fish that are possibly black and white - maybe can sample off those at really high magnification. But GOPR0233, nothing, not even sure what color the fish there are supposed to be - bluish grey maybe ? Only inroad I can see there is to start 'rebuilding' the Red channel with an initial RG/RB sub-channel shift, align the Red and Green channel profiles as closely as possible (referencing Histogram), see what colors that looks to be pulling-up and plumb for a color mix that is in someway believable.
__________________
Nostalgia's not what it used to be Last edited by WorBry; 19th June 2018 at 06:31. |
|
|
|
|
19th June 2018, 09:46
|
#5 | Link |
|
Registered User
Join Date: Mar 2015
Posts: 775
|
There is no torch. In "cave" there is a wide opening behind the camera, this is how I get there. Also since light falls off with distance it looks like the camera emits some light.
I have an idea to try: when clipping is applied to colored highlight, the highlight remains colored (6-axis), or saturates slowly per rgb channel (levels). It might be more convenient if clipping/overflow resulted in desaturation of highlight. GOPR0233 Hard to say, some bright spots could be dead coral, I consider these white. Also coral rock to the right. 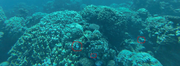 Ideally we want white references at multiple distances. The fishes on top maybe gray or very close to.
__________________
VirtualDub2 |
|
|
|
|
19th June 2018, 14:58
|
#6 | Link | ||||
|
Registered User
Join Date: Jan 2004
Location: Here, there and everywhere
Posts: 1,197
|
Quote:
") Quote:
Quote:
Many years back I concocted an AVS function (SelSah) that could be helpful there - applies Tweak parameters (including Saturation) over a defined luma range. http://blog.niiyan.net/post/666717637/selsahv3 This is the type of situation I had in mind when I queried the prospect of a '3-way' version of the '6-axis color correction' filter in the other thread. Anything else in VDub that could be brought to bear? Create a luminance mask with gradation curves maybe? Still, the 'soft clipping' approach works quite well in Resolve. One of the nice things about Resolve is that it does all processing in the background at full 'data' levels with 32-bit float. So no data is lost. Even when working at constrained 'Video' (Limited/broadcast safe) levels on the timeline (which I'm not in this case), outlying values can be pulled into range. If I can arrive at a decent result (using only Channel Mixer) in Resolve, I'll look at the options more closely in VDub2. Quote:
__________________
Nostalgia's not what it used to be |
||||
|
|
|
|
20th June 2018, 00:41
|
#7 | Link | |
|
Registered User
Join Date: Jan 2004
Location: Here, there and everywhere
Posts: 1,197
|
OK, here's one of the better attempts at correcting the 'Cave' clip in Resolve using just the RGB Channel Mixer for the color balancing.
 The 'soft clip' strategy for dealing with the 'skylight' worked out quite well. It did increase the gain some to compensate for the 'soft-clip'. Could be a bit brighter I guess but I tend to prefer a moodier look. I think it achieved what I set out to do i.e. Quote:
Anyhow, this was the best compromise I could find and evidently there are limitations to what can be done with the Channel Mixer alone in a scenario like this. It clearly begs for further fine tweaking with the 3-way Color Wheels. With that, I'll give it a go in VDub2. Depending on how it comes out of the Channel Mixer, I see what can be done to tweak it with the '6-axis corrector' or maybe RGB curves. Edit: Just realized when I brought the rendered file (Cineform) from that Resolve grade into VDub2 to take the above frame shot I forgot to specify full range luma in the decode interpretation options. Here it is again:  That looks better. Some very pale yellow discoloration in the 'skylight' opening is showing through there, but it's barely noticeable. That said, having gone on to replicate the color correction process in VDub2 I am having issues with that. Need to look at it more closely.
__________________
Nostalgia's not what it used to be Last edited by WorBry; 20th June 2018 at 06:58. |
|
|
|
|
|
20th June 2018, 11:01
|
#8 | Link |
|
Registered User
Join Date: Mar 2015
Posts: 775
|
Interesting, your result looks nice. This is where I get to with vdub:
 Would be good to go if I somehow fixed the skylight. Some ideas I'm thinking about: adding another gauge to desaturate overflows (turns something very bright into white) adding 3-way thing with adjustable split points (it seems a fixed split is not enough) producing alpha mask at some point and applying it to secondary filter (too much complexity begins) What is the soft-clip you are talking about, is it a tweak in Channel Mixer? What it does? Re: cineform does Resolve always export full range? I saw no obvious flag in SDK to realize full/limited range. Can you export this same frame as cineform?
__________________
VirtualDub2 |
|
|
|
|
20th June 2018, 19:35
|
#9 | Link | |||||
|
Registered User
Join Date: Jan 2004
Location: Here, there and everywhere
Posts: 1,197
|
Quote:
Quote:
Resolve has two sets of ('4-way') color wheels - the 'Primary Wheels' that operate through Lift, Gamma, Gain and (master) Offset, and the 'Log Wheels' that operate on definable Shadow, Mid-Tone, Highlight domains (plus master 'Offset'); there's no Mid-Tone range setting per se - that is automatically adjusted when the Shadow and Highlight domain ranges are defined. They are called 'Log Wheels' because the flexibility in control makes them particularly well suited for grading log gamma footage - they are just as useful for 'linear' video. This article by Alex Van Hurkman gives a nice overview of differences in the control modalities applied to color tools with similar names in different software and clarifies the sometimes confusing terminologies associated with them: https://www.provideocoalition.com/whats-in-a-name/ Quote:
Quote:
 The scopes are scaled for 10-bit. There are separate 'soft-clip' controls for Highlights and Shadows, but options to apply the 'soft-clip' to the RGB channels individually or ganged together. Very useful tool. Resolve also has a dedicated Soft-Clip LUT generator, allowing the soft-clip to be applied via a LUT in the node workflow. Typical use might be when you are grading full range footage at full 'Data' levels but want to render out at 'Video' (Limited, 'broadcast-safe') levels - it offers an alternative to hard-clipping (limiting) or compression. I used it in this context because the channel mix was increasing the net gain and crushing more of the highlights in the aura around that 'skylight', so producing a more diffuse light beam. Bringing those values down with a hard clip caused marked color variegation - the values in the centre of the opening were of course already blown (clipped) in the original footage. Applying the 'soft-clip' helped to create a smoother transition gradient and at the same time brought near-blown highlights down to a level that I legitimately could use as neutral reference. It meant though that there was a limit to which I could 'tighten' the spread of the light beam (closer tp the original) - anymore than I did and the yellowish discoloration would be much more stronger. Selective desaturation of the offending color would mitigate that, but I decided not to apply it in Resolve because there's no equivalent tool in VDub2.....yet  Attempting the same technique in VDub2 using RGB (gradation) curves to create the 'soft-clip' is proving tricky. Need to get the curve gradient just right, and avoid adding contrast, which only makes it worse. Best results so far are when the soft-clip is applied before the Channel Mixer in the filter sequence, which makes sense - once crushed (clipped) up at 255 that 'super-white' data can't be recovered - in Resolve it can, so it doesn't matter if the 'soft-clip' is applied after the channel mix. Quote:
Not surprising then that VDub2 doesn't register any full range flag with these Resolve Cineform exports either. Not a big deal. Just something to be aware of....and remember.
__________________
Nostalgia's not what it used to be Last edited by WorBry; 21st June 2018 at 18:53. |
|||||
|
|
|
|
21st June 2018, 03:00
|
#10 | Link |
|
Registered User
Join Date: Jan 2004
Location: Here, there and everywhere
Posts: 1,197
|
OK, here are my best attempts at correcting the 'Cave' clip in VDub2 using only Channel Mixer for the color balance and applying the 'soft-clip' strategy for dealing as best with the 'skylight'.
 Input was the source clip pre-denoised with SMDegrain (same as used in the Resolve grade) - I've yet to get reacquainted with hqdn3d The applied filters were, in order: * 'Soft-clip' applied with RGB Gradation Curves * Channel Mixer * 6-axis Color Correction - saturation only * Levels - adjusted only the black point (Input level 44) (I know, why didn't I use '6-axis' - old habits I guess) * Unsharp Mask * Color Tools - for scope monitoring, and Resize, Crop when I needed them for isolating the neutral references. No added contrast was applied - it only hindered the sensitive 'skylight' workaround. Hardly needs contrast anyway. The first two results (Mix 1A and B) were obtained using the skylight itself as the neutral reference for the channel mix. Mix 1B is a tad warmer. As seen in the Resolve grade, there is more of a residual blue tint on the Sergeant Major fish. The other two results (Mix 3 and 4) attempted to lessen that and reach a better compromise, but at the expense of an arguably less appealing greenish tinge on the margins of the skylight glow. In all 4 cases I tweaked the 'soft clip' as best to limit spread of the skylight 'glow' whilst avoiding discoloration of the (now obscured) opening. The 'soft clip' curve is not as smooth as I would like - there's a bit of posterization coming through at the outer margins of the skylight glow as it spills over the rocks, but it's difficult to get right by hand. 'Poetic license' might see that as the contours in the rock, which is fine by me. In the original clip there were some flashes of what looked like reddish lens flare on the left side of frame, so attribute it to that Personally, I think Mix 4 is a bit too green, and it's between the other three. For the fish I'd say Mix 3. For the 'skylight', Mix 1A. What does Toupe Turtle think ? http://birdsasart.com/248/Pacifc-Gre...-Galapagos.jpg Errrrrrrrrrrrrrrrrr......none of them
__________________
Nostalgia's not what it used to be Last edited by WorBry; 21st June 2018 at 16:37. |
|
|
|
|
24th June 2018, 11:04
|
#11 | Link |
|
Registered User
Join Date: Mar 2015
Posts: 775
|
Can you post your settings 1A?
I'm away on vacation, will resume experiments when I come back.
__________________
VirtualDub2 |
|
|
|
|
24th June 2018, 18:31
|
#12 | Link | |
|
Registered User
Join Date: Jan 2004
Location: Here, there and everywhere
Posts: 1,197
|
Quote:
Filters, in order: *Gradation Curves - RGB (adjusted) Soft clip curve co-ordinates: In/Out Values 0, 0 64, 64 128, 128 192, 192 224, 221 237, 230 255, 239 *Channel Mixer (Emiliano Ferrari's) RR 67.68 RG 73.73 RB 16.50 GR 48.63 GG 100 GB 0 BR 20.51 BG 29.59 BB 74.71 Note: the channel value sliders don't actually allow fine control to 2 decimal points - they nudge in increments, just not whole numbers. *6-Axis Corrector: Saturation 1.522 *Levels: Input 44,255, Output 0,255 *Unsharp Mask: Radius: 1.6 Strength: 1.11 Threshold: 0 Edit: I also looked at applying the 'soft-clip' curve at increasing strengths, to pull the skylight glow in tighter. Absolute maxiumum you can go before the 'clipped value' discoloration starts to come through is around: In/Out 0,0 64,64 128,128 192,176, 209,184, 234,190 255,192 But then banding in the transition gradient becomes more noticeable and the curve starts to impact linearity in the upper-mids requiring more tweaks to the channel mix and Levels/Gamma adjustment. It's a balancing act.
__________________
Nostalgia's not what it used to be Last edited by WorBry; 24th June 2018 at 19:03. |
|
|
|
|
|
26th June 2018, 05:30
|
#13 | Link |
|
Registered User
Join Date: Jan 2004
Location: Here, there and everywhere
Posts: 1,197
|
Here's another version that (I think) achieves better balance on the 'cave' clip.
 This used the same preliminary channel mix as Mix 1A (with the skylight for neutral balance) but I then used RGB curves to apply a progressive shift in the Blue/Red balance over the tonal curve to produce a warmer mix in the darker tones. In essence, it substitutes for what, in Resolve, could be (better) applied with the Primary Wheels or Bars (i.e. Lift, Gamma, Gain). I could probably manipulate the curves further to target that feint blue tint that is still coming through on the Sergeant Major fish, but it's very finicky. The curves tool in Resolve has a nice feature where samples taken off the image are marked by the component values on the RGB curves, making it easier to target and manipulate specific colors. Still the VDub2 result is better than it was and it holds up pretty well throughout the clip. Untested as yet, but I'm sure the same can be done in AVISynth with RGBAdapt. The settings are the same as those I posted for Mix 1A above, but with the addition of RGB gradation curves, placed between 'Levels' and 'Unsharp Mask 'in the filter sequence. The R and B curve coordinates were: Mode: RGB Adjusted + R/G/B Red Channel: In/Out 0,6 255,255 Blue Channel: In/Out 23,0 255,255 Simple as that, just linear shifts in the R and B curve gradients. Moving on to the remaining two test clips, similar considerations apply to GOPR0201 where we again have patches of skylight flooding in from above. Like the 'cave' clip, it makes sense to use the skylight as a reference for the channel mix (especially as there is a paucity of other neutral subject matter) but with the inevitable consequence that colored objects at lower depths are blighted with blue/magenta casts and under-representation of reds/yellows, resulting in washed-out, off colors - that yellow (ochre) coral bed in GOPR0201 being a prime example. Tweaking the channel mix at best achieves a mediocre and unsatisfying compromise. So far I've managed to come up with some quite nice grades in Resolve using the Channel Mixer and Primary Color wheels, coupled with 'soft-clips' applied to the individual RGB channels for fine tuning of the highlights and shadows - and without recourse to 'qualifiers'. The tricky part is now translating those manipulations into RGB curve representations that can be applied in VDub2 and in a way that produces a smooth transition of hues in the sea background. This type of scenario is where a 3-way version of the '6-axis color corrector' would come in very handy (hint, hint). I'll post some results when I'm done, but will be going on vacation myself next week.
__________________
Nostalgia's not what it used to be Last edited by WorBry; 26th June 2018 at 05:52. |
|
|
|
|
26th June 2018, 21:24
|
#14 | Link | |
|
Registered User
Join Date: Jan 2004
Location: Here, there and everywhere
Posts: 1,197
|
Quote:
Original GOPR0201 clip:  Pre-denoised (SMDegrain) and graded in Resolve using just the RGB Channel Mixer for setting the color balance - 'skylight' used as the neutral reference. And then the usual levels/contrast adjustment, mid-tone detail' (local contrast) and sharpening:  Same initial channel mix followed by some secondary manipulations with the color wheels to shift the bias to warmer tones at the lower depths:  A 'soft clip' applied to the Red channel helped to preserve the cooler neutral balance of the skylight. Also applied some lift in the shadows (without raising the black point) to bring out more detail - Resolve has a tool specifically for that. Plus the usual contrast, mid-tone detail, sharpening. A lot better I think. Brings the coral to life. Replicating the grade in Vdub2 with Channel Mixer + RGB curves is proving more tricky. Very difficult to achieve smooth transition of hues in the sea background, especially when saturation (which it needs) and a little contrast are added. Here's a preliminary result using only linear shifts in the R,G and B curve gradients (no soft clipping) and no added saturation or contrast. Very much work in progress:  The color balance per se holds up reasonably well over the entire clip, but I think it would need dynamic adjustment of levels (and saturation) at key points - just the job for 'Master Blend'. If you want to play with it, the settings were, in sequence: Source: Original clip pre-denoised (SMDegrain) *Channel Mixer: RR 71.68% RG 101.76% RB -58.69% GR 10.55% GG 90.72% GB 0% BR -11.52% BG 7.52% BB 101.76% *RGB Gradation Curves: Mode: RGB Weighted + R/G/B Red: In/Out 0,7 255,235 Green: In/Out 10,0 255,255 Blue: In/Out 28,0 247,255 (Keeps a slight cool bias on the 'skylight' ) *Levels: In: 32,255 Out:0,255 *UnSharp Mask: Radius: 1.6 Strength: 1.09 Threshold: 0 Edit: I guess it's not too bad 'as-is' with added saturation. Here Saturation +1.4 with the '6-axis corrector' placed between the RGB Curves and Levels in the sequence.  As you can see though, it brings out more green hues around the margins of the 'skylight'. Needs some fine re-tweaking of the color balance. Edit: Alternatively, could be done using 'RGB Levels' filter in place of RGB Curves:  So, there: *Channel Mixer: As above *Levels: In: 0, 1.080, 255 Out: 12, 234 *RGB Levels: Red: 0.14, 0.985 Green: 0.213, 0.923 Blue: 0.246, 0.95 *Unsharp Mask - as above It would benefit from a 'soft clip' instead of 'hard clip' on the Red channel highlights, but it's OK. Edit: And the last remaining test clip GOPR0233. Original:  Corrected with VDub2 using the same process - Channel Mixer > Levels > RGB levels, plus (in this case) some added contrast and saturation, and the usual sharpening:  I think that combination works rather well. Process settings in that case were: Source: Original clip pre-denoised (SMDegrain) *Channel Mixer: RR 53.61% RG 164.94% RB -73.73% GR 10.55% GG 98.73% GB 0 BR -28.61% BG 18.55% BB 83.69% *Levels: Input: 20, 1.080, 255 Output: 0,255 *RGB Levels: Kept a slight blue bias on the 'skylight' Red: 0.13, 0.95 Green: 0.194, 0.921 Blue: 0.241, 0.926 *RGB Gradation Curves (for centre-relative contrast): Mode: RGB Adjusted Coordinates: In/Out 0,0 64,57 128,128, 192,196 255,255 *'6-Axis Corrector' (for Saturation only) + 1.461 *Unsharp Mask: Radius: 1.6 Strength: 1.09 Threshold: 0
__________________
Nostalgia's not what it used to be Last edited by WorBry; 28th June 2018 at 16:47. |
|
|
|
|
|
28th June 2018, 15:37
|
#15 | Link |
|
Registered User
Join Date: Jan 2004
Location: Here, there and everywhere
Posts: 1,197
|
Shekh, in your video demo of Master Blend you used a hover-over 'RGB picker' tool:
https://youtu.be/3PHcVBgqoHY Where can that be found? Also, re: your 'RGB Levels' filter. I see that the Gamma parameter is not implemented as yet. Do you plan to do so ? With that addition it would better serve as a '3-way' (Lift, Gamma, Gain) substitute for the Primary Color Wheels/Bars in Resolve.
__________________
Nostalgia's not what it used to be Last edited by WorBry; 28th June 2018 at 16:02. |
|
|
|
|
2nd July 2018, 12:22
|
#16 | Link |
|
Registered User
Join Date: Mar 2015
Posts: 775
|
Thanks for great correction examples, I think I will review my procedures and update/replace some filters.
> your 'RGB Levels' filter. I see that the Gamma parameter is not implemented as yet. Do you plan to do so ? With that addition it would better serve as a '3-way' (Lift, Gamma, Gain) substitute for the Primary Color Wheels/Bars in Resolve. I abandoned this filter since It wasn't useful for me (per-channel correction did not feel intuitive and I liked the idea of single filter for all changes). Will see what I could do with the new suggestions. > hover-over 'RGB picker' tool This is activated by holding "Shift" key. It also was present in old VD but with many issues.
__________________
VirtualDub2 |
|
|
|
|
2nd July 2018, 13:48
|
#17 | Link |
|
Registered User
Join Date: Jan 2004
Location: Here, there and everywhere
Posts: 1,197
|
OK thanks. On vacation myself just now so won’t be doing any video processing for a couple of weeks
__________________
Nostalgia's not what it used to be Last edited by WorBry; 2nd July 2018 at 22:58. |
|
|
|
|
19th July 2018, 14:14
|
#18 | Link | |
|
Registered User
Join Date: Jan 2004
Location: Here, there and everywhere
Posts: 1,197
|
Quote:
__________________
Nostalgia's not what it used to be |
|
|
|
|
 |
| Thread Tools | Search this Thread |
| Display Modes | |
|
|


 Linear Mode

