Welcome to Doom9's Forum, THE in-place to be for everyone interested in DVD conversion. Before you start posting please read the forum rules. By posting to this forum you agree to abide by the rules. |
 2nd November 2014, 23:59
|
#1 | Link |
|
Registered User
Join Date: Aug 2007
Posts: 44
|
Film Degrain and video Noise Removal
Greetings
the following clip is from a film transfer to 3/4 umatic tape of which I then captured http://www.mediafire.com/download/c2...5ci78/clip.avi so I want it progressive and to remove film grain as film was already grainy but when they transferred film they turned up enhancement to much, which made picture even more grainy and also causes some odd video noise in the picture, sorta of a pattern which can been seen in blacks the most I was using the following script AVISource("c:\clip.avi") AssumeBFF QTGMC() SelectEven() TDecimate() I used that to make it 23.976 if I use this method field matching TFM() TDecimate() it leaves alot of noise in the pic and aliasing does it matter? if i use QTGMC or Field Matching? then to remove spots RemoveSpotsMC3X(0) the reason I listed it out like the above is I am explaining the way to make picture as clean as possible and then after above script what I would like suggestions to now remove grain and video noise I described above many thanks J 
|

|

|
|
3rd November 2014, 01:20
|
#2 | Link |
|
Registered User
Join Date: Jul 2010
Location: Germany
Posts: 357
|
You could try this:
Code:
AVISource(...).AssumeBFF QTGMC(FPSDivisor=2) TemporalDegrain  EDIT: Although TFM.TDecimate.TemporalDegrain looks better Last edited by creaothceann; 3rd November 2014 at 01:23. |
|
|
|
|
3rd November 2014, 02:08
|
#3 | Link | |
|
Registered User
Join Date: Aug 2007
Posts: 44
|
Quote:
will give both of those a try and report back J |
|
|
|
|
|
4th November 2014, 00:12
|
#4 | Link | |
|
Registered User
Join Date: Aug 2007
Posts: 44
|
Quote:
the walls were the grain was now looks like they are alive and crawling with bugs...any way to make them smoother and not have so much movement in them? many thanks J |
|
|
|
|
|
4th November 2014, 01:10
|
#5 | Link |
|
Registered User
Join Date: Feb 2002
Location: California
Posts: 2,695
|
First of all,
Code:
tfm() tdecimate() I tried using your QTGMC code, and it took 8x longer and produced virtually identical results. I don't know why you had problems with the simple tfm/tdecimate code, but it worked perfectly on your clip when I tried it. Here is the result I got when I used my version of VideoFred's film restoration script. Grain Reduced Clip I turned all the sharpening parameters down to almost nothing, because the last thing the clip needs is sharpening. I then used block size of 16 for MDegrain, with an overlap of 4, and used the two-step degraining (which is hard-wired into my version of Fred's script, but which you can find in the MVTools2 documentation). I think you will find the grain remarkably reduced. Of course there is some inevitable correlation in the resulting reduced grain, and you may not like this, but that is going to happen with just about any solution you come up with. [edit]Make sure you download and then play the clip. I just clicked on the link to test it, and on my computer the "streaming" playback does not look the same as when you play the original on your computer using a decent media player. Last edited by johnmeyer; 4th November 2014 at 01:11. Reason: Added caveat about streaming/playback after seeing problems with Mediafire playback |
|
|
|
|
4th November 2014, 03:10
|
#6 | Link |
|
Registered User
Join Date: Aug 2007
Posts: 44
|
my questions concerning making clip to 23.976 is what is more efficient to use QTGMC as it de-interlaces the 2 interlaced frames or use the TFM which matches the fieldsI
I will download your clip and look at it, could I see the script you used for this clip? thanks J |
|
|
|
|
4th November 2014, 04:24
|
#7 | Link | |
|
Registered User
Join Date: Feb 2002
Location: California
Posts: 2,695
|
Quote:
2. This material is not interlaced, at least not in the usual sense because there is no temporal difference between most fields. So, QTGMC is, IMHO, the wrong tool for the job. TFM/TDecimate was designed specifically for this purpose and is the correct tool to use. |
|
|
|
|
|
4th November 2014, 09:05
|
#8 | Link | |
|
Registered User
Join Date: Aug 2007
Posts: 44
|
Quote:
Any other takers? |
|
|
|
|
|
4th November 2014, 16:34
|
#9 | Link | |
|
Registered User
Join Date: Feb 2002
Location: California
Posts: 2,695
|
Quote:
I think you may have some issues with your computer setup, or perhaps you accidentally played something other than the clip you downloaded from my link above. As for the grain removal not being significant, that isn't true either. It is true that there is still grain, but the reduction is most definitely significant. I played the original side-by-side with the modified clip that I posted, and the difference is quite large. If your goal is to remove all grain, you are going to be disappointed because any technique that succeeds in removing ALL grain will also introduce a huge number of artifacts, and will ruin detail. Restoration is about reducing artifacts without introducing new problems. Good luck with your project. Last edited by johnmeyer; 4th November 2014 at 16:35. Reason: added the "accidentally played" sentence. |
|
|
|
|
|
4th November 2014, 16:43
|
#10 | Link | |
|
I'm Siri

Join Date: Oct 2012
Location: void
Posts: 2,633
|
Quote:
|
|
|
|
|
|
4th November 2014, 16:57
|
#12 | Link |
|
Registered User
Join Date: Feb 2002
Location: California
Posts: 2,695
|
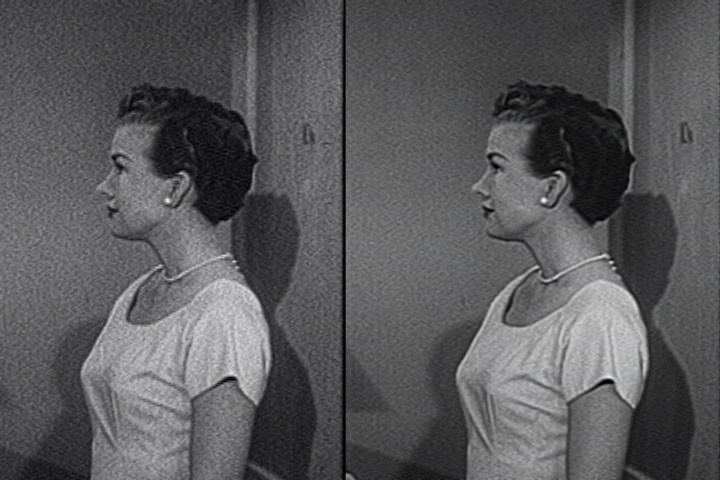
For those who want to see the difference, here is a still shot of the before/after. What this doesn't show, which is far more significant, is the reduction in the movement of the grain. The smaller and softer grain is no longer as "busy" and therefore less distracting. Note also that you can more easily see the contours on her face, and that the switch on the wall behind her head is more prominent.
Last edited by johnmeyer; 4th November 2014 at 16:58. Reason: changed "not" to "no" |
|
|
|
|
4th November 2014, 19:48
|
#14 | Link | |
|
Registered User
Join Date: Aug 2007
Posts: 44
|
Quote:
I understand that reducing grain/noise will take away detail, but that is the sacrifice you make. I would rather have a nice smooth picture that is a tad soft then a super grainy pic J |
|
|
|
|
 |
|
|


 Linear Mode

