Welcome to Doom9's Forum, THE in-place to be for everyone interested in DVD conversion. Before you start posting please read the forum rules. By posting to this forum you agree to abide by the rules. |
 29th December 2014, 00:21
|
#1 | Link |
|
Registered User

Join Date: Dec 2014
Location: @2100m in Colorado USA
Posts: 56
|
How to fix blown highlights (blue rings)
(WHEW! That five-day wait before being allowed to post is a killer... used up most of my Christmas vacation waitinggggggg... :-D )
I am ramping up to do higher-quality 8mm film capture to digital.*** My current challenge: no matter what settings I use, the off-scale white highlights on the film are completely "blown" and surrounded by pretty large blue fringe. (See below for a middling case -- bad but not the worst I've had...) Does anyone have ideas or scripts or plugins that can handle this kind of thing? This seems worse than the usual Chromatic Aberration, although I'm open to all suggestions. Thanks much! This looks like a GREAT community. I look forward to contributing here over time... Blessings, Pete 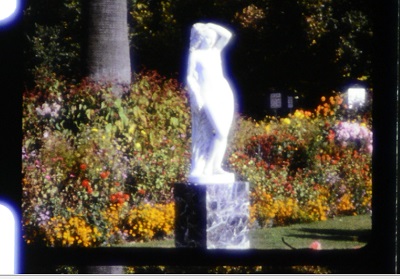 *** I have a MovieStuff Sniper HDL, which came with an early HD Camcorder, the Canon HV20 -- very poor low-light sensor... I'm converting to use my wife's Nikon DSLR, direct to HDMI, and from there to my PC... I'll explain more about my setup once I am more confident that my process is actually working! :-D Last edited by MrPete; 29th December 2014 at 03:08. |

|

|
|
29th December 2014, 00:42
|
#2 | Link |
|
Registered User
Join Date: Mar 2012
Location: Texas
Posts: 1,666
|
Attachments can sometimes take some time to get approved. If you don't want to wait any longer then upload your picture to a 3rd party image host. Even better is a small unprocessed sample from the original source.
|
|
|
|
|
29th December 2014, 03:13
|
#3 | Link | |
|
Registered User
Join Date: Dec 2014
Location: @2100m in Colorado USA
Posts: 56
|
Quote:
OK. Fixed the attachement. And there are two clips at http://www.ds.org/files/avisynth blown-bluefringe1.avi is 40MB, a few frames from one section... blown-bluefringe.avi is a couple hundred frames, around 200MB (once it is done uploading in a few minutes from now) Please ignore other defects... this is almost-raw (about half the frames are removed already, and it is vertically flipped so it makes more sense  ) )
|
|
|
|
|
|
29th December 2014, 03:16
|
#4 | Link |
|
Registered User
Join Date: Dec 2014
Location: @2100m in Colorado USA
Posts: 56
|
Hmmm... staring at these clips, I think it IS chromatic ab... the blue shifts depending on where it is on-screen.
That doesn't help me. It only shows up for blown highlights... and I don't know how to correct for it in AviSynth in any case 
|
|
|
|
|
29th December 2014, 06:12
|
#5 | Link |
|
Registered User
Join Date: Feb 2002
Location: California
Posts: 2,695
|
I do film transfers using Roger's Workprinter. I think the Sniper also uses the external aerial lens. Alignment is tricky, and if done incorrectly, you will definitely get rainbow fringing. I bought one of Roger's very first Workprinters, and corresponded directly with him. I have copied below the alignment instructions he sent to me over a decade ago.
Before copying that, let me say a word about exposure. When doing film transfers, you have to understand that film has a much, much greater exposure lattitude than does video. This means it can record a much greater luma range, from very bright to very dark, without going all the way to black, and without bleaching out the highlights. Unless you have a very, very expensive camera that lets you create a custom gamma curve inside the camera, you cannot possibly capture this entire range. What's worse is the fact that the exposure meter on your camera will expose for the average luma value, and this will often completely blow out the highlights on white shirts, etc. So, here's what you do. First, if your camera has a "spotlight" function, enable it. This is designed to reduce the exposure for a subject on a stage, lit by a follow spot. When used during film transfer, it will also reduce the exposure if it senses a really bright object. Second, if you can, use a camera that has zebras. Set this to 100+ or 100. Nothing lower. Then, if you see zebra patterns, which show that something is being overexposed, use the EV adjustment on your camera to reduce the exposure until the zebras disappear. Remember to increase this again when the scene changes to a darker exposure. If you can't stand by the camera and monitor the entire capture, then at least watch a few minutes just to make sure you aren't getting any zebras. If you follow these directions, you should end up with a slightly under-exposed result. That's OK because you can almost always still recover all the stuff in the shadows. To do this, I create a custom histogram in Sony Vegas using its Color Curve function. There are functions in AVISynth that can also be used, including HDRAgc (I think that's what it's called). The key is that you want to increase the exposure of the darker pixels without changing either the very darkest or very lightest pixels at all. I'll put Roger's quote in the next reply. |
|
|
|
|
29th December 2014, 06:12
|
#6 | Link | |
|
Registered User
Join Date: Feb 2002
Location: California
Posts: 2,695
|
From Roger Evans, many years ago:
Quote:
|
|
|
|
|
|
29th December 2014, 18:11
|
#7 | Link |
|
Registered User
Join Date: Dec 2014
Location: @2100m in Colorado USA
Posts: 56
|
Thanks, John! That gives me a few things to work on. Not sure if I can eliminate the CA "mechanically" or not... we'll see.
A few FYI's: * The Sniper has some obvious differences. Your Workprinter focus/alignment instructions involve both projector and camera focus. My Sniper has no projector lens or focus. I am shooting directly on the film plane. * It will be interesting to see what options I have for modifying my capture process. My wife has some high end pro DSLR equipment that I am occasionally borrowing for this project... normally it seems hardly likely that people would have any of this for film conversion... just WAY too expensive! - Nikon D800e DSLR with 36mpxl FX sensor (closed down to DX to get the 1.5x multiplier). No noise at all to ISO 1000+, better results than the Sniper's Canon HV20 even at ISO 10,000+ - 70-200mm f2.8 zoom lens with 1.7x TC - Plus I'm using the close-up adapter that came with the Sniper, and 77-43mm step-down ring. The only real downside to my rig is that the D800 only allows me to set the shutter speed in full manual exposure mode.... what I would love is a true shutter-priority auto-exposure, and that is apparently not available  I will do some realignment experiments tonight. In the meantime: I'm still curious if there's a way to remove the blue fringe via a processing step... |
|
|
|
|
29th December 2014, 18:39
|
#8 | Link |
|
Registered User
Join Date: Feb 2002
Location: California
Posts: 2,695
|
Hmmm ... If you don't have the external aerial lens, then I don't know how you are getting the chromatic aberrations. Perhaps something internally is out of alignment. You might want to contact MovieStuff.
There are quite a few threads about removing colored halos. Here is some code which shifts ALL colors down or left. I think it could be adapted to only handle blue. Start by setting Hshift to +2 (it moves the colors to the left) and see what you get. Keep increasing it. Eventually you'll get halos out the other side of the object. Code:
Vshift=0 Hshift=0 MergeChroma(crop(fields,Hshift,Vshift,0,0).addborders(0,0,Hshift,Vshift)) |
|
|
|
|
30th December 2014, 14:08
|
#9 | Link |
|
Registered User
Join Date: Dec 2014
Location: @2100m in Colorado USA
Posts: 56
|
(BTW, how long before doom9 stops asking me stupid "random questions"? Or does everyone always have to answer?)
It does appear that the bloom is radial in a sense: it is not always on the same side of the highlight; depends on where in the frame. I've been able to greatly reduce the number of frames with blooming; it all seems to depend on the amount of contrast in the frame, and I can't completely eliminate it without switching from auto exposure to manual exposure (which would just be too painful). I think I will run with what I've got, then move on. (BTW, MovieStuff no longer services, supports, or responds to questions about any earlier devices. Kinda painful since I've not owned mine all that long! They just dropped EVERYthing else in favor of their new line of machines. Very sad )
|
|
|
|
 |
|
|


 Linear Mode

