Welcome to Doom9's Forum, THE in-place to be for everyone interested in DVD conversion. Before you start posting please read the forum rules. By posting to this forum you agree to abide by the rules. |
 2nd June 2023, 10:36
|
#121 | Link |
|
Registered User
Join Date: Jun 2020
Posts: 303
|
Converting from dx9 to dx11 hlsl shaders
with mpc-hc, you need put your custom hlsl shaders in the .\shaders (for dx9) and .\shaders11 (for dx11). The shaders need to be have the same filename (ex: bShadows.hlsl) to be applied correctly when switching between dx9 and dx11 renderers.
It's easier to develop the shaders in dx9 Evr-CP, with the debug shader compiler output available. You can then port the shader to dx11. For this, I was able to use BingChat (I specified that the language is similar to C and gave an input/output example from mpc-hc shaders).
__________________
bShaders: realtime Effects/filters for video players |

|

|
|
5th June 2023, 07:51
|
#122 | Link | |
|
Registered User
Join Date: Oct 2010
Posts: 131
|
Quote:

|
|
|
|
|
|
6th June 2023, 05:39
|
#123 | Link |
|
Registered User
Join Date: Jun 2020
Posts: 303
|
My understanding is that potplayer does support hlsl pixel shaders, but I don't know the specifics as I don't use this player.
Some players require the the shaders to have a .txt extension instead of .hlsl. Video players often come with different shader bundles (ex: mpc-hc vs mpc-be) , some shaders will simply have been renamed. If he has the required folder permissions, the user can delete these shaders and copy whatever shaders he likes to the shader folder
__________________
bShaders: realtime Effects/filters for video players |
|
|
|
|
19th June 2023, 10:47
|
#124 | Link |
|
Registered User
Join Date: Jun 2020
Posts: 303
|
(win10, uwp) automatically process video to enhance it
Video "Enhancements" by the graphics card driver.
The graphics card driver can process video being played back. ex: Intel graphics command center > Video This applies to directshow players such as mpc-hc, mpc-be but not vlc, mpv. for uwp apps (incl. ms store apps like Movies & TV, wmp, windows media, etc.) there is an extra switch to enable/disable this feature. Win10 > Apps and Features > Video Playback > x automatically process video to enhance it. or > ms-settings:videoplayback These adjustments settings (noise reduction, sharpness, skin tone, contrast) can be useful but they are vendor specific and not well documented. It's a manual, slider-based, permanent video adjustment hidden in a tab of the control panel app. You can set up custom profiles, but if you need specific adjustments for one video, you would need to remember to reset to the default profile after watching the video, which typ. isn't practical.
__________________
bShaders: realtime Effects/filters for video players Last edited by butterw2; 21st June 2023 at 20:18. |
|
|
|
|
22nd June 2023, 13:11
|
#125 | Link |
|
Registered User
Join Date: Jun 2020
Posts: 303
|
I've started uploading some simple shaders for my color Adjustment pixel shader pack (A-pack). It will be available for dx9, dx11 and mpv.hook: https://github.com/butterw/bShaders/tree/master/A-pack
The shaders typically only have one parameter and provide easy color adjustments, these can typically be useful when watching (web) videos. ex: The traditional Brightness control (rgb shift) is poor. vs Lift doesn't affect the white point (1, 1) and vs Exposure doesn't affect the black point (0, 0). EDIT: The only benefit would be that Brightness doesn't change contrast at all.
__________________
bShaders: realtime Effects/filters for video players Last edited by butterw2; 21st December 2023 at 23:12. |
|
|
|
|
25th June 2023, 15:42
|
#126 | Link |
|
Registered User
Join Date: Jun 2020
Posts: 303
|
Saturation Adjustment
Saturation refers to the intensity of color. Gray pixels have a saturation of 0, whereas pure color (ex: red) has a saturation of 1. Sat = max(r, g, b) - min(r, g, b), normalized to [0, 1] Saturation adjustments need to be small as they can quickly lead to an oversaturated or desaturated picture. Vibrance attempts to solve this with a smart saturation approach (parameter Vibrance>0: saturate the low saturation areas, <0: desaturate the high saturation areas). For video player shader based adjustments, 2 shader parameters values would cover most needs: vibrance.35: get more vibrant colors vibrance-15: reduce oversaturation Skintones are quite sensitive to saturation (ex: orange or pasty grey skin) and creating a dedicated shader to correct this issue specifically might be useful.
__________________
bShaders: realtime Effects/filters for video players Last edited by butterw2; 25th June 2023 at 15:45. |
|
|
|
|
28th June 2023, 20:26
|
#127 | Link |
|
Registered User
Join Date: Jun 2020
Posts: 303
|
Comparing contrast enhancement shaders:
The simplest and fastest approach is to use rgb expansion: - contrast 0.10 or - contrastB_W (10_240 to 0_255) this requires only a single arithmetic operation and the results are typically quite good. The drawback is potential clipping. A more advanced approach would be to use a S-curve: Increases contrast in the mid-tones by pushing shadows down and highlights up. This reduces contrast in shadows and highlights, but doesn't clip them. ex: sweetfx.curves #2 in rgb, Strength: 0.125 (1 texture, 9 arithmetic), incl. 7 arithmetic required to calculate the S-curve. https://raw.githubusercontent.com/bu...mg/S-curve.png ! S-curves lose contrast and brightness in shadows, so dark scenes tend to be slightly worse with the s-curve. Finally there are some fakeHDR type approaches: Take a SDR input video and try to make it look like HDR. The result is still SDR though. - sweetfx.fakeHDR (hlsl): (17 texture, 35 arithmetic) - faux_hdr.glsl Some conclusions: - All the listed shaders will enhance a video lacking contrast. Typically more vibrant colors would also be desirable. - faux_hdr.glsl probably gave the best results (depending on the input), however it isn't a lightweight shader. - There isn't much need for tuning. The required contrast enhancements are typically small. - Doing a comparison of multiple shaders (+parameter values) isn't simple, but can be achieved by setting up mpc-hc shader presets or by configuring mpv input.conf.
__________________
bShaders: realtime Effects/filters for video players Last edited by butterw2; 5th November 2023 at 21:58. |
|
|
|
|
16th July 2023, 08:34
|
#128 | Link |
|
Registered User
Join Date: Jun 2020
Posts: 303
|
Another candidate for lightweight too dark/too bright adjustment shader.
Photoshop Multiply/Screen Blend (brightness/contrast curves) c0 = (1-Multiply)*c0 + Multiply*c0*c0 with c0: pixel.rgb in [0, 1.0] (1 texture, 3 arithmetic) parameter Multiply [-1, 1], 0: no effect positive: (Multiply Blend) decreases brightness and increases contrast in highlights without clipping. negative: (Screen Blend) increases brightness and constrast in shadows without clipping. Apply when picture is too dark. ex: Outdoor night shots, ex: -0.3.
__________________
bShaders: realtime Effects/filters for video players Last edited by butterw2; 20th July 2023 at 18:15. |
|
|
|
|
18th July 2023, 16:19
|
#129 | Link | |
|
Registered User
Join Date: Oct 2010
Posts: 131
|
Quote:
|
|
|
|
|
|
19th July 2023, 07:31
|
#130 | Link | |
|
Registered User
Join Date: Oct 2010
Posts: 131
|
Quote:
|
|
|
|
|
|
20th July 2023, 18:51
|
#131 | Link |
|
Registered User
Join Date: Jun 2020
Posts: 303
|
tooDark
@toniash https://github.com/butterw/bShaders/...s/tooDark.hlsl [4-5]: plot for Multiply: -1 and -0.3 (red) [10-11]: The alternative I was initially considering was a gamma correction style curve (applied in the default sRGB, 1 texture, 9 arithmetic): pow(c0.rgb, 1.0 - B), with ex: B=0.15 (gamma_c=1/(1-B)=1.1765). [6 hidden]: The linear equation Exposure c0.rgb *(1.0 + Exposure) (1 texture, 1 arithmetic) is OK for small adjustments like 0.10, but it does clip inputs>1/(1+Exposure). However in most cases the required adjustments are small and highlight clipping isn't always an issue with dark videos. Contrast=1+Exposure is constant. EDIT: Here's a link to an interactive Desmos calculator plot of the curves: https://www.desmos.com/calculator/eibkoj8sgp EDIT2: Whether a video is too dark does depend quite a lot on viewing conditions (ex: daytime vs perfect dark), so it's good to have good adjustment options available.
__________________
bShaders: realtime Effects/filters for video players Last edited by butterw2; 30th July 2023 at 23:49. |
|
|
|
|
26th July 2023, 11:41
|
#132 | Link |
|
Registered User
Join Date: Jun 2020
Posts: 303
|
Brightness testing Update.
I've done some more testing on Brightness Adjustments. I use mpc-hc with shader presets set up for each shader+value, and I play test clips, switching the shader on/off and switching between presets. I do this during the day and at night (different lighting conditions). There are 2 types of useful brightness adjustments: a1) boosting a clip that could maybe be brighter. a2) the clip is too dark. I tested different ajustments curves: - Legacy brightness adjustment: rgbShift(0.05) - brightenD(0.06) - exposure(0.08) - tooDark(0.15), Multiply: -0.15 - Gamma Correction: bGamma(0.10), gamma_c =1.111 - tooDark(0.20) Conclusions: - the legacy brightness adjustment x+Brightness is never good. The problem of raised black levels can be solved by adding a Shadows term, I call this new shader brightenD: out = x + Brightness -Brightness*(1-x)^4 with x, out: pixel.rgb in [0, 1.0]. (1 texture, 5 arithmetic). Contrast is increased in Shadows, but unchanged in the rest of the curve. - exposure.08 (1 texture, 1 arithmetic) This small exposure adjustment often works well in a1 case, because it increases both contrast and brightness. It has the lowest increase in brightness in shadows of all the listed approaches. The drawback of exposure is that it blows-up/clips the highlights. This is also true for the previous rgbShift and brightenD approaches. tooDark doesn't have this problem. The increase in brightness is max at the midpoint. I typically prefer this to a Gamma Correction, which has high contrast near Black and max brightness increase before the midpoint, as this can lead to rather flat images. Also tooDark is significantly faster. The last two approaches are the best for case a2, as parameter values can be pushed up if needed. Edit2: There are also higher order curves which have max brightness beyond the midpoint. It's possible to select a curve that doesn't clip (contrast will decreases sharply in the Highlights though). These curves are intermediates between tooDark and exposure.08. Note: The tooDark shader user parameter has been changed to a positive value as this is more logical. The default value for tooDark will be lowered to 0.24 as this is typically enough for a2 (higher values are possible). Maybe I'll also provide a 0.12 shader for a1 type ajustments without highlights blow-up. Edit: tooDark.24 and brightenD.06 have the same brightness impact except in Highlights: https://github.com/butterw/bShaders/...6.png?raw=true
__________________
bShaders: realtime Effects/filters for video players Last edited by butterw2; 30th July 2023 at 23:43. |
|
|
|
|
6th August 2023, 00:11
|
#133 | Link |
|
Registered User
Join Date: Jun 2020
Posts: 303
|
#mpv: Custom On Screen Display (OSD) my mpv.conf file
This post covers customization of the standard mpv OSD messages, for deeper customization scripts can use an overlay. OSD customization options / properties: --keep-open=yes Keep the player window open after the end of file is reached. <no, yes, always> default: no --window-scale The windowed mode video zoom level, default: 1.000 --hidpi-window-scale=no default: yes --fullscreen (or --fs) start in fullscreen. default: no --osd-on-seek=msg-bar <no, bar, msg, msg-bar>, default: bar --osd-msg3="(${percent-pos}%) ${playback-time}" displayed by (P) show-progress and on seeks. displays: (54%) 00:32:20 default: "${playback-time} / ${duration}" : 00:45:10 / 01:30:00 --osd-duration=2000 #default: 1000 (ms) --osd-margin-x=10 #default: 25 (in scaled pixels) --osd-margin-y=10 #default: 22 --osd-color= 1.0/0.93/0.93/0.97 r/g/b/a [0, 1.0], or 0.95 gray level. default: white, "#FFFFFFFF" --osd-back-color= "#e6202020" #argb, a background color makes (small) text much easier to read. default: transparent black. --osd-font = "Segoe UI" (default: sans-serif >> Arial) --osd-font-size =40 #default: 55.0 --osd-scale-by-window=no default: yes --osd-shadow-offset=4 default: 0, you can use this to pad dark-background text (! osd-back-color must not be completely transparent). osd-bar=yes --osd-bar-align-y=1.0 (bottom osd-bar). default: 0 middle-bar --osd-bar-w=100 full-width --osd-bar-h=0.3 # if you need chapter markers, you could use something like: --osd-bar-h=1.0 --osd-bar-border-size=0.25 --osd-bar-border-size=0 default: 1.2 (mpv0.37-dev) OSD Messages: --osd-playing-msg, --term-playing-msg displayed when a new video is loaded, default: "" --osd-playing-msg-duration (in ms) [0 to 3600000] default: 0 (=osd-duration) --osd-level <0, 1, 2, 3>, default: 1. --osd-msg1 default: "" default osd (osd-level=1) ! only one message at a time can be displayed on the default osd. --osd-msg2 alternate osd (osd-level=2), default display: > 00:45:10 playing > symbol is: "${osd-sym-cc}" --title The window title. default: "${?media-title:${media-title}}${!media-title:No file} - mpv" typ. displays: my_video.mp4 - mpv see https://mpv.io/manual/stable/#property-expansion --term-status-msg terminal status message, ex display: (Pause) AV 00:00:50 / 00:01:02 (80%) --display-tags comma separated list of metadata tags that are displayed in the terminal, when a new file is loaded. default: "Artist,Album,Album_Artist,Comment,Composer,Date,Description,Genre,Performer,Rating,Series,Title,Track,icy-title,service_name,Uploader,Channel_URL" --osd-fractions default: no. times are displayed with milliseconds (hh:mm:ss.xxx) --background (black bars color) ex:"#FFBBBBBB" default(#ARGB): "#FF000000" ${clock} 24h system time 18:52 # osd-msg display vs osd-level osd display can be permanent (until changed or disabled) or limited by duration (uses osd-duration by default). osd-msg1 : default osd (osd-level=1) osd-msg2 : alternate osd (osd-level=2) osd-msg3 : show-progress and seeking osd. with osd-level=3 : osd-msg3 becomes the permanent osd. osd-level=0 : no-osd on commands, show-text and scripts can still display to osd. mpv offers plenty of options for customizing the OSD (rendered with libass) and it's possible to go further with user scripts (.lua or .js). # how to correctly toggle a permanent osd with a keybinding (the osd stays visible until disabled, it will auto-update when needed, in this case when a new file is loaded): --osd-msg2="${filename}\n${file-size}" input.conf: O no-osd cycle-values osd-level 2 1 To achieve a similar result with just input.conf, you need to block the property expansion using the `raw` prefix. input.conf: N raw no-osd cycle-values osd-msg1 ${filename:} "" stats.conf An example of OSD achievable with an mpv script is the built-in stats OSD pages (default keybinding: i/I, you can then change the page number: 0-4), page_2 is of particular interest as it shows the output chain (video-filters, scalers and active shader passes). the script can be configured by portable_config\script-opts\stats.conf https://github.com/mpv-player/mpv/bl.../man/stats.rst or --script-opts These script-opts options / script.conf file options are a nice feature of mpv, this feature can be added to any user script without too much trouble with mp.options.read_options. #ex: you can change the temporary display duration in second (default: 4) as it might be a bit short. duration=10 scroll_lines=5 #rebinding the hotkeys for the different pages with key_page_1, key_page_2, etc. can be useful for non-us keyboards.
__________________
bShaders: realtime Effects/filters for video players Last edited by butterw2; 9th January 2024 at 16:22. Reason: --script-opts, +my mpv.conf file |
|
|
|
|
8th August 2023, 10:56
|
#134 | Link |
|
Registered User
Join Date: Jun 2020
Posts: 303
|
mpv script: avg-bitrate.js /mpv v0.36 user-data
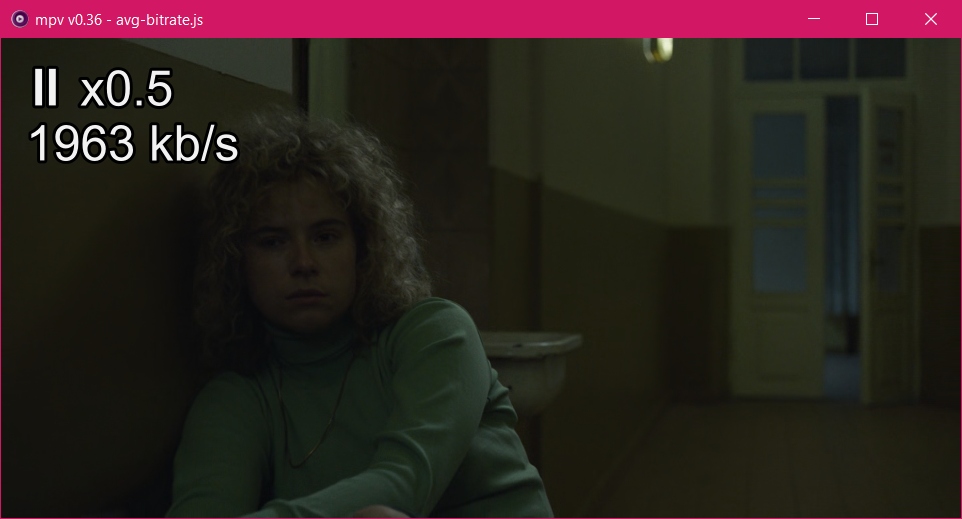 Here's my mpv script that calculates and displays the average bitrate in kbps of the video being played (using the video file properties file-size and duration): https://github.com/butterw/bShaders/...avg-bitrate.js v0.20: A new property named user-data was added in mpv v0.36. It can be used by scripts to save their data (ex: the calculated avg-bitrate is saved to a custom property named user-scripts/avg-bitrate). ex, display average bitrate on osd for 2 seconds when key a is pressed: input.conf: a no-osd show-text "${user-data/avg-bitrate}" 2000 v0.11: v0.11 might be a better starting point for writing very simple custom osd scripts, and it doesn't use user-data (req. mpv v0.36). The output can be printed to the terminal, and/or displayed in the OSD (automatically for every file loaded or (by default) on demand for 0.7seconds via a keybinding). input.conf: a script-message avg-bitrate
__________________
bShaders: realtime Effects/filters for video players Last edited by butterw2; 6th January 2024 at 15:41. |
|
|
|
|
9th August 2023, 14:26
|
#135 | Link |
|
Registered User
Join Date: Jun 2020
Posts: 303
|
input.conf: keep only the keybindings you need
mpv --no-input-default-bindings
When it comes to keybindings mpv has some great features: - a separate file for keybindings: portable_config\input.conf: this is a human readable/editable text file that lists the keybindings and comments (including #menu: context-menu entries). - you can have multiple keybindings for the same command. - each keybinding can be associated with (custom) commands and script functions. - it is possible to view the active keybindings on screen (stats > page 4) or export them to the standard output, or test a pressed keyboard key for associated bindings. Like a number of other video players mpv has far too many keybindings active by default. This isn't helpful, IMO it is better to learn/use just the hotkeys you need and associate them with your favoured keys. If you use a non-US keyboard you'll likely need to change at least some keybindings. In mpv, there are two ways of solving this problem: 1) override individual default keybindings: input.conf: CTRL+c ignore #disables the built-in Ctrl+c quit hotkey. 2) OR more radical: disable all built-in hotkeys, including the default bindings defined in user scripts (with mp.add_key_binding) and use only the ones defined in your input.conf. mpv.conf or mpv command-line option: --no-input-default-bindings This is the approach I would recommend for more advanced users. You'll need to have a complete input.conf file ready for this. As a starting point, the file listing the default keybindings is available here: https://github.com/mpv-player/mpv/bl...etc/input.conf # indicates a comment in .conf files. So everything after # on a line will be disregarded. Finally, the --no-config startup option allows you to test mpv without loading mpv.conf or input.conf (default keybindings are used).
__________________
bShaders: realtime Effects/filters for video players Last edited by butterw2; 24th December 2023 at 11:45. Reason: . |
|
|
|
|
9th August 2023, 18:13
|
#136 | Link |
|
Registered User
Join Date: Feb 2019
Posts: 231
|
If I can make a request?
Can you make an mpv script that displays the APL of the current frame? Some information about this: https://projectiondream.com/en/movie...-measurements/ The Math?: https://www.avsforum.com/threads/wha...#post-61334794 And if you can support both 2.2 and 2.4 gamma for the math, that would be ideal. If this is even possible, thanks for your consideration! Last edited by SirMaster; 9th August 2023 at 19:45. |
|
|
|
|
10th August 2023, 22:25
|
#138 | Link | |
|
Registered User
Join Date: Jun 2020
Posts: 303
|
Quote:
__________________
bShaders: realtime Effects/filters for video players |
|
|
|
|
|
15th August 2023, 20:57
|
#139 | Link |
|
Registered User
Join Date: Jun 2020
Posts: 303
|
#More on mpv custom OSD scripts
Mpv has many features, some of them great, but is often criticised for lacking the level of polish you can expect from GUI players such as mpc-hc on Windows. There hasn't been much progress on this, the on-screen controller script osc.lua is still weak (flawed design, OK in fullscreen but too small in windowed mode, no real user configurable options) and generally not all program defaults are well thought out. One might ask whether it is possible to customize mpv to make it more like a minimal (no-gui) mpc. Maybe with some effort you could come close. I am not going to attempt this, as I have different use cases for mpc-hc/mpc-be and mpv, and I am also not claiming mpc is perfect. Still I think the results of this endeavour would be of interest to some users. To add some conclusions to my previous posts on the subject of custom OSD for mpv: - Mpv has many built-in OSD options and properties the user can combine. - But the formats/strings used to display each properties are hardcoded (ex: OSD of file-size, playback-time, etc.) and actually can't be changed by users at all. - It is possible to override the default OSD through scripting. This typically only requires a couple lines of fairly simple code (but modifying an existing script is probably easier). - Don't expect script performance to match optimized native compiled code, but lightweight scripts should run OK. - Javascript has nice syntax, but probably worse performance than lua (if it matters). Not all language features are available, which can make string manipulation troublesome. - User scripts are less convenient to use than properties as they can't be used in mpv.conf or in startup options. But the new mpv v0.36 user-data custom properties can be used to get around this (see my script below). - With a stronger OSD, maybe the OSC can be dispensed with alltogether (--no-osc). My custom OSD stats script for mpv v0.36: https://github.com/butterw/bShaders/...ripts/bstat.js ex, custom osd using new user-data properties (calculated by the script): --osd-msg2 = "${osd-sym-cc} ${percent-pos}% of ${user-data/duration}\n${user-data/res} ${user-data/ar}\n${user-data/file-size}\n${user-data/avg-bitrate}-${audio-bitrate:}\n${video-format:}: ${video-bitrate:}" show-time ms: display playback-time / duration to OSD (with optional duration in ms) For durations less than an hour, the default mpv format 00:25:18 / 00:50:00 gets shortened to 25:18 / 50:00 (like in mpc-hc).
__________________
bShaders: realtime Effects/filters for video players Last edited by butterw2; 4th December 2023 at 23:08. Reason: bstat.js v.20: no longer redefines seek OSD |
|
|
|
|
17th August 2023, 21:59
|
#140 | Link |
|
Registered User
Join Date: Jun 2020
Posts: 303
|
# time display formats of modern video-players (PC, android, web)
formats used for on-screen-display of playtime / duration. 01:05:28 legacy format: used by many players (0) when durations >1h, ex: movies. 01:05:28.250 ms precision format available as an option in some players (1) (@25fps, 1 frame corresponds to 40ms) 08:04 / 51:10 short format, used in mpc-hc and many other players (but not mpc-be) (2) when duration <1h, ex: TV series, podcasts, ... 00:42 | 01:18:44 Windows media player (3) short format applied also to playtime 00:42 | 1:18:44 vlc (v3.0.18 PC): short+ format (4) duration <10h, drops the leading zero on hours for duration and playtime when playtime<1h, short format applied to playtime. 00:42 | -1:18:02 time-remaining display (replaces duration) (4b) 0:07 / 3:23 Shorter format (5) when duration <10 minutes, ex: short videos, music, ... 0:42 / 1:18:44 shortest format, used by youtube, web-browsers (6) 35:04 / 1:18:44 1:05:28 / 1:18:44 All leading zeros are dropped for duration and for playtime >1 minute 08:26 / 85:23 minutes only format (7) 08:26 / 117:30 doesn't use hours, just minutes, ex: sport broadcast. same as short format except for durations >1 hour. # What does typical video-player time display look like ? - Internet short clips or Audio file (music): 00:00:00 / 00:00:15 legacy time format 00:00:00 / 00:03:20 00:00 / 00:15 short format 00:00 / 03:20 makes the display significantly more readable when playing short clips. 0:00 / 0:15 shortest 0:00 / 3:20 >>btime.js - Full length movie: 00:08:00 / 01:42:25 legacy time format 08:00 / 1:42:25 short+ format (vlc pc) >>btime.js 8:00 / 1:42:25 shortest format. What works best comes down to the duration of the videos, the available screen space and user preferences. The time display format doesn't have to be user configurable, but legacy time format shouldn't be the only option. For PC players, versatile defaults such as mpc-hc or a shorter variant can be good replacements IMO. EDIT: my lightweight btime.js script for mpv uses a format similar to youtube but better suited for movies. The script can now also be configured to display a different time formats (ex: format=mpc-hc). There are essentially 3 considerations: 1) do you drop the leading zero for hours 2) do you drop the leading zero for minutes 3) do you apply the same format for playtime and duration. This avoids having to add extra time digits during playback. For something quite different you can try my last seconds countdown OSD, ex: -10s. The link to the lua version is in the next post.
__________________
bShaders: realtime Effects/filters for video players Last edited by butterw2; 17th January 2024 at 00:42. Reason: +btime.js (v0.30 update) +obs_countdown.js mpv scripts |
|
|
|
 |
| Tags |
| hlsl, mpc-be, mpc-hc, mpv, pixel shaders |
| Thread Tools | Search this Thread |
| Display Modes | |
|
|


 Linear Mode

