Welcome to Doom9's Forum, THE in-place to be for everyone interested in DVD conversion. Before you start posting please read the forum rules. By posting to this forum you agree to abide by the rules. |
 19th March 2024, 05:32
|
#1001 | Link | |
|
Registered User
Join Date: Aug 2016
Posts: 609
|
Quote:
 On a separate note I deleted my previous comment about SLRad because after more testing the info I wrote was wrong. The way QTGMC sharpens the image is still somewhat dynamic and unpredictable depending on duplicate frames in the clip and InputType. In the end I settle on 0.2 for InputType=1 and 0.4 for InputType=2&0 but I'm still testing with lots of content. Note: static test patterns should not be used because it's temporal sharpening. What you want is a scene with a little bit of camera movement with an actors face at a distance, then look how sharp their facial features are compared to no QTGMC at all. I think that might be the optimal sharpness setting, maybe. Last edited by flossy_cake; 19th March 2024 at 05:34. |
|

|

|
|
19th March 2024, 06:58
|
#1002 | Link |
|
Registered User
Join Date: Jan 2018
Posts: 2,156
|
MVTool2 just need the fftw3 libraries in some functions. Did you try fftw3 3.3.10 version?
https://forum.videohelp.com/threads/...ftw-3-3-7-DLLs |
|
|
|
|
19th March 2024, 07:17
|
#1003 | Link | |
|
Registered User
Join Date: Aug 2016
Posts: 609
|
Quote:
Did some more sharpness tests and came to the conclusion it's not worth messing with the advanced sharpening settings as they can make an improvement on one scene and then do the opposite on another scene. Probably because it's a temporal filter so it all depends on what's moving, whether previous frame was a duplicate, etc. etc. |
|
|
|
|
|
19th March 2024, 12:20
|
#1005 | Link |
|
Registered User
Join Date: Jul 2018
Posts: 1,068
|
" why QTGMC still works without it "
MAnalyse only uses fftw if dct>0. So for spatial-only search modes it does not require external fftw.dll and does not try to load it. So someone may try to look into QTGMC script (which modes uses MAnalyse with dct=0) and add to documentation the description of modes not required fftw.dll as dependency. In current documentation at http://avisynth.nl/index.php/QTGMC DCT (0...10) Modes to use DCT (frequency analysis) or SATD as part of the block matching process - see MVTools2 documentation for choices. Default: 0 As I see in that version https://raw.githubusercontent.com/re...0up/QTGMC.avsi DCT is not enabled in any internal preset - so only user can set DCT>0 as QTCMC() params and cause loading of fftw.dll. Last edited by DTL; 19th March 2024 at 12:28. |
|
|
|
|
22nd March 2024, 14:58
|
#1006 | Link |
|
Registered User
Join Date: Aug 2016
Posts: 609
|
Thanks for clarifying.
Today I was playing around with LimitedSharpen which uses MaskTools2 and RGTools, which if I'm not mistaken are the same libraries QTGMC uses to apply sharpening. Anyway I find the sharpening quality of LimitedSharpen is better as it produces less artefacts. I wonder if it's possible to mod QTGMC to use LimitedSharpen instead. I had considered just doing QTGMC(Sharpness=0).LimitedSharpen() but I don't think it's the same because QTGMC sharpening is temporally limited (SLMode=2) so it would need to be modded into QTGMC itself but I don't have the expertise. |
|
|
|
|
29th March 2024, 07:19
|
#1007 | Link |
|
Registered User
Join Date: Aug 2016
Posts: 609
|
The reason I'm complaining about the sharpening is that QTGMC needs some sharpening to counteract its [desirable] antialiasing blur, but it has this tendency to oversharpen high contrast outlines, especially if the source has such style of "baked in" sharpening where even QTGMC(InputType=1, Sharpness=0.2) still oversharpens those outlines to the point it's noticeable at normal viewing distances (paradoxically it seems less noticeable at close viewing distances).
Lowering the sharpening to 0.1 or 0.0 isn't an option as then the blur becomes noticeable so I can't find a happy middle ground. What I'd like is to swap QTGMC's internal sharpener for LimitedSharpen, which uses the same MVTools functions to sharpen, so it should be possible to substitute in but could only by done by an author who understands QTGMC like Dogway, A.SONY or Vit. |
|
|
|
|
2nd April 2024, 18:03
|
#1008 | Link |
|
Registered User
Join Date: Aug 2016
Posts: 609
|
Just thought I'd share these images showing the differences between the 3 QTGMC modes (InputType=0/1/2) in case it helps newcomers understand the resolution-antialiasing tradeoff in each mode.
I've read several anecdotes of people being turned off QTGMC because of its excessive smoothing, but perhaps they are not aware there are 2 other modes which are a lot different in that regard. To understand what's going on you'll need to view these images at 1:1 pixel mapping. This is hard to achieve for multiple reasons like Windows DPI scaling, browser scaling, Lensdump's website scaling, and row/column driver shenanigans on LCD's. Just keep fiddling until you see perfect full-contrast 1 pixel thick white and black lines in the bottom right corner of the test patterns next to the number 1. Test image 1 - static scene resolution test. This shows how much resolution is preserved on elements that are stationary.  Test image 2 - moving resolution test. The black frame of his glasses are moving and therefore the source only contains 288p resolution when it is moving due to the field cadence being 1:1 where each 720x288 field is a new image. This is useful for looking at how good each mode is at antialiasing the 288p to something that is far more pleasant to look at especially on a bigger screen. 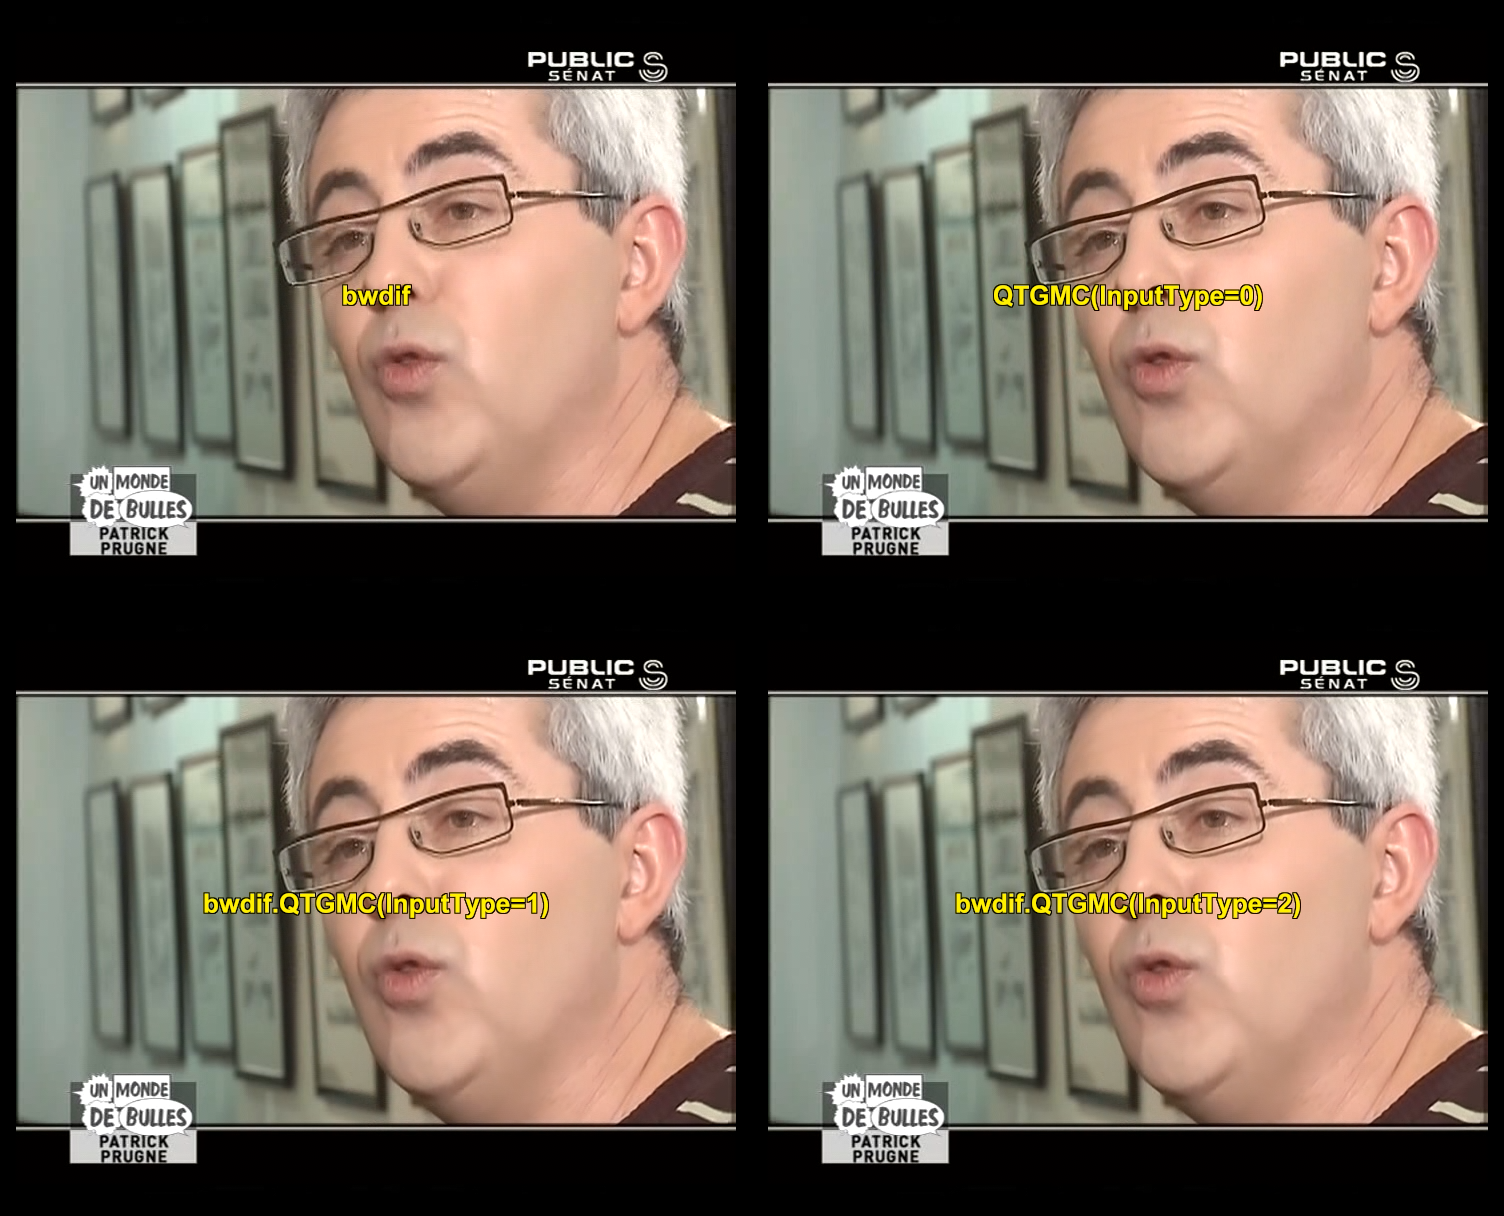 Explanation of modes: InputType=0 is the default mode which performs deinterlacing and smoothing. Vertical resolution is significantly reduced in this mode. I wouldn't call it "half vertical res" (see the converging lines) but it's certainly not full vertical res. I would only use this mode on dirty sources that need a significant cleanup. It's also good at smoothing sources with field misalignment where fields were scaled independently of eachother during post production. InputType=1 is the light progressive repair mode for use on content that has already been deinterlaced or IVTC'd. This is my personal preference as it scrubs very small amount of detail on moving parts only. InputType=2 is the strong progressive repair mode. It's the same as mode 1 but does additional smoothing on moving parts of the image. As you can see in the screenshot the 1 pixel thick static lines on the test pattern are still fully resolved, but the moving glasses frame is getting nnedi3 interpolated and is noticeably less aliased than InputType=1. This is probably my preferred mode for 1:1 field cadence video. However some 1:1 cadence stuff is already smoothed/filtered in the source and InputType=1 can give a cleaner result. Viewing distance and screen size obviously plays a big part when we are dealing with only 288p/240p resolution. I neglected to label the QTGMC(Sharpness=x) value in the screenshots. In my opinion the default value of 1.0 is too high and produces an image that is not representative of the source sharpness in A-B comparisons. I'm currently using values of 0.2/0.4/0.6 for InputType=1/2/0 respectively. I am confident of the value 0.2 for InputType=1, but still fiddling with the other two. QTGMC uses temporal sharpness limiting where only moving parts of the image are sharpened for the sake of counteracting softening caused by itself. In my opinion this sharpening is necessary as Sharpness=0 appears softer than the source in A-B comparisons on moving elements (moving elements could include slight camera movements or an actors face slightly moving, so this countersharpening comes into play quite a bit). If you have a soft source and would like to sharpen it I would not recommend trying to sharpen it with the QTGMC sharpness value which should only be used to counteract the softening caused by its own antialiasing, and nothing more. If you want to add more sharpening beyond that, do that afterwards with something like LimitedSharpen and/or aWarpSharp for edge thinning. Script used for the screenshots Code:
source = "https://drive.google.com/uc?export=download&id=1WfW3yXmGhIvUCiexQGYD18gSiXRe2bze"

LWLibavVideoSource(source, stream_index=-1, repeat=true)

orig = last

# double rate perpixel deint with slightly raised weave thresh
bwdif = orig.bwdif(field=-2, thr=2)

# QTGMC default mode
qtgmc0 = orig.QTGMC(InputType=0, Sharpness=1.0, preset="slow")

# QTGMC progressive repair 1
qtgmc1 = bwdif.QTGMC(InputType=1, Sharpness=0.2, preset="slow", rep0=13)

# QTGMC progressive repair 2
qtgmc2 = bwdif.QTGMC(InputType=2, Sharpness=0.4, preset="slow", rep0=13)

top_row = StackHorizontal(
\ bwdif.SubTitle("bwdif", align=5, size=30).AddBorders(16,16,16,16),
\ qtgmc0.SubTitle("QTGMC(InputType=0)", align=5, size=30).AddBorders(16,16,16,16))

bottom_row = StackHorizontal(
\ qtgmc1.SubTitle("bwdif.QTGMC(InputType=1)", align=5, size=30).AddBorders(16,16,16,16),
\ qtgmc2.SubTitle("bwdif.QTGMC(InputType=2)", align=5, size=30).AddBorders(16,16,16,16))

StackVertical(top_row, bottom_row)
edit: I forgot to mention as QTGMC is a temporal filter by nature it behaves slightly differently when processing video where each frame is a new unique image vs video containing duplicate frames. For example double framerate deinterlacing will give you duplicate frames on film based content, and in this case the duplicates slightly reduce QTGMC's smoothing effect as well as its countersharpening strength. So don't expect same results when using the progressive repair modes on say 25p vs 50p. 25p will have more smoothing and countersharpening, 50p will have less smoothing and countersharpening. Subjectively I prefer the result when the source contains duplicates, but you can't just chop it in half afterwards with SelectEven() as there is stuff going on with visual persistence when seeing antialiased topfield followed by antialiased bottomfield rapidly and successively that doesn't occur after chopping in half. edit2: also forgot to explain the rep0=13 setting in the script above. Basically this setting I found through trial and error was best at reducing motion artefacts, especially when there are duplicate frames in the source, and especially for animation. 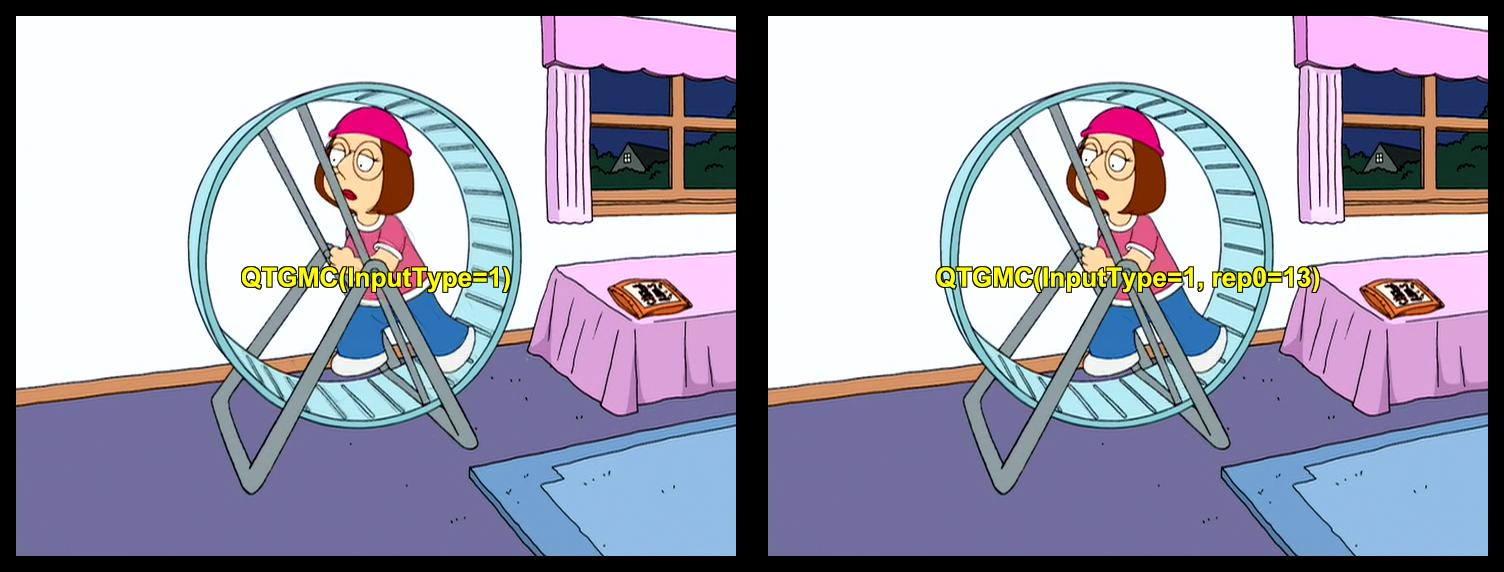 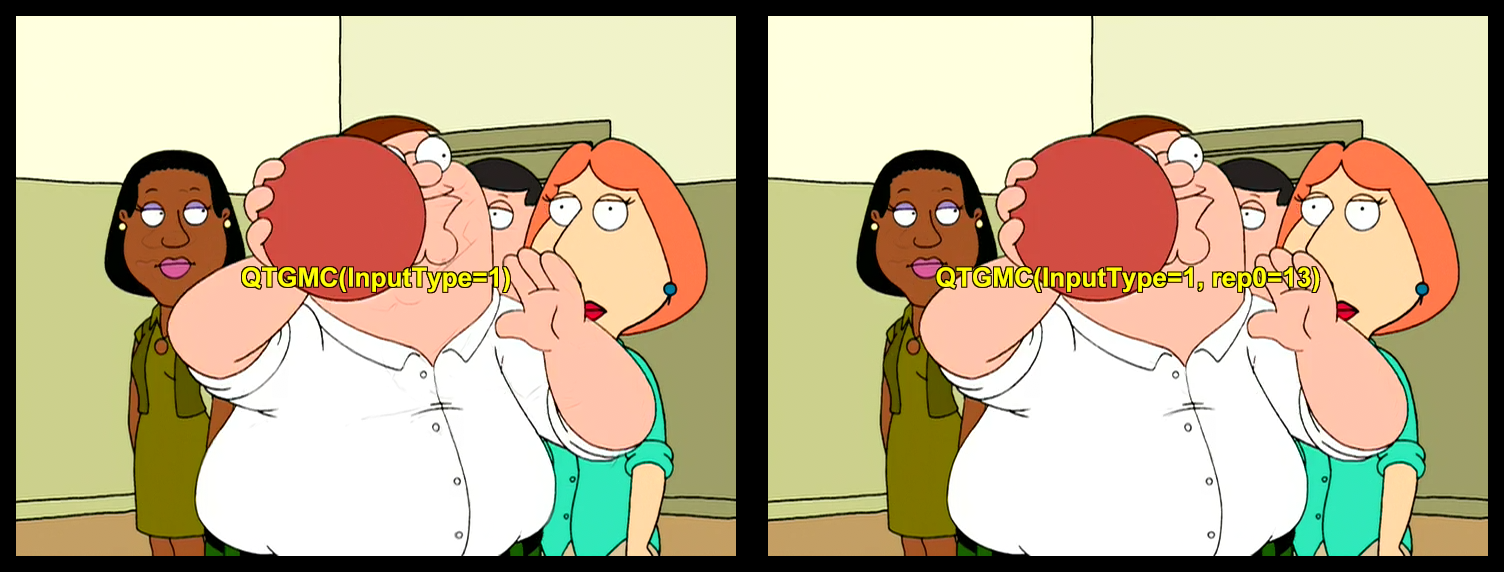
Last edited by flossy_cake; 2nd April 2024 at 20:54. |
|
|
|
 |
| Thread Tools | Search this Thread |
| Display Modes | |
|
|


 Linear Mode

